Installing a Test Agent Appliance as a bootable image on a USB memory stick
This page explains how to install a Test Agent Appliance as a bootable image on a USB memory. You can then boot a PC from that USB memory and temporarily transform the PC into a Routing Active Testing measurement device.
In the instructions given below, the installation procedure is done using a GUI application named Etcher. If you are skilled in working with bootable disk images, you can alternatively manage without this program. You can then download the img.gz file mentioned below and transfer the embedded disk image to a USB memory using the Unix/Linux/Mac OS X command dd.
Warning
Be careful to write to the correct disk; otherwise you might wipe your entire PC.
Installation procedure
Download the Test Agent installer from Control Center:
Click Test Agents in the main menu.
Click the Download button in the top right corner.
In the dialog that appears, click the link RAW disk image (.img.gz) to download.
Note
The disk image is compressed using the GZIP compression format. If you are not using Etcher (see below), you will need to decompress the image before flashing it. To uncompress the archive, use one of the following tools:
7-Zip (Windows)
The Unarchiver (Mac)
gzipcommand line utility (Linux)
Writing the image to a USB memory stick using Etcher
Warning
Any existing content on the USB memory will be erased.
Download Etcher and install it.
Insert a USB memory stick with at least 4 GB of free space into your PC.
Open Etcher, and from your hard disk select the Test Agent
.img.gz.Select the USB memory stick you wish to write your image to.
Review your selections and click Flash!
Using the USB memory stick
Insert the USB memory into a PC with USB boot support.
Turn on the PC.
Access the BIOS boot menu. In many cases you can do that by pressing one of the keys F8, F11, or F12 during start-up.
Make sure the USB memory comes before the PC hard disk in the boot sequence.
Select USB boot from the BIOS boot menu.
The boot process takes about 20 seconds. When the login prompt is shown, log in as user “admin” with password “admin”.
A text-based menu will now appear:
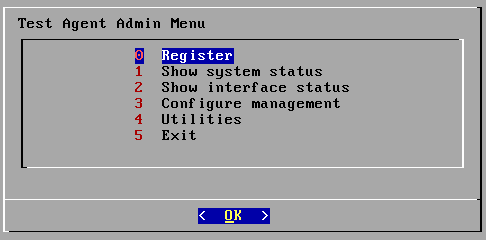
Make sure the PC is connected to the Internet using a wired interface. You can check the link status by selecting Show interface status; read more about that here.
You can also change IP addressing for management of the Test Agent by selecting Configure management. By default, the Test Agent uses DHCP on the first detected interface (normally called “eth0”). If your network does not offer DHCP addresses, you need to specify a static IP address on the Test Agent; how to do this is explained here. The same page also explains how to specify a different interface for Test Agent management.
If your PC has multiple wired interfaces, and you are unsure which interface is eth0, unplug all interfaces but one and select Show interface status to see which interface has a link detected. It is helpful to label each interface with a sticker for easy reference when cabling on-site.
Before you can use the Test Agent, you also need to register it with the Routing Active Testing server. How to do this is explained here.
After successful installation, the Test Agent will check for new software packages to ensure that it is up to date. This process may take several minutes to finish. After completing the update check, the Test Agent should automatically appear in your Routing Active Testing account.
Click Test Agents on the main menu. This view shows all Test Agents in your account. Verify that your Test Agent is found here and has a green dot next to it, signifying that it is online.
If the Test Agent does not have a green dot, check that it has a license assigned (this is normally done automatically upon registration):
Click the Test Agent in the Test Agents view, then click the License tab.
If the Test Agent does not have a license, you need to assign one as explained here.