Setting up a Test Agent to act as proxy in tests
Using one of your Test Agents as a proxy makes it possible to do testing with Test Agents that would otherwise not be reachable from the Internet or from Routing Active Testing cloud servers. You might, for example, want to test and monitor an IP telephony network that does not allow any connection to the Internet.
The Routing Active Testing proxy enables a forwarding mechanism for the management traffic between the Test Agents and the Routing Active Testing cloud server in networks that do not have public IP addresses.
A proxy Test Agent always communicates with other Test Agents on the same port which it uses for communication with Control Center.
Only Test Agent Appliances can act as proxies and test via a proxy; Test Agent Applications do not have these capabilities.
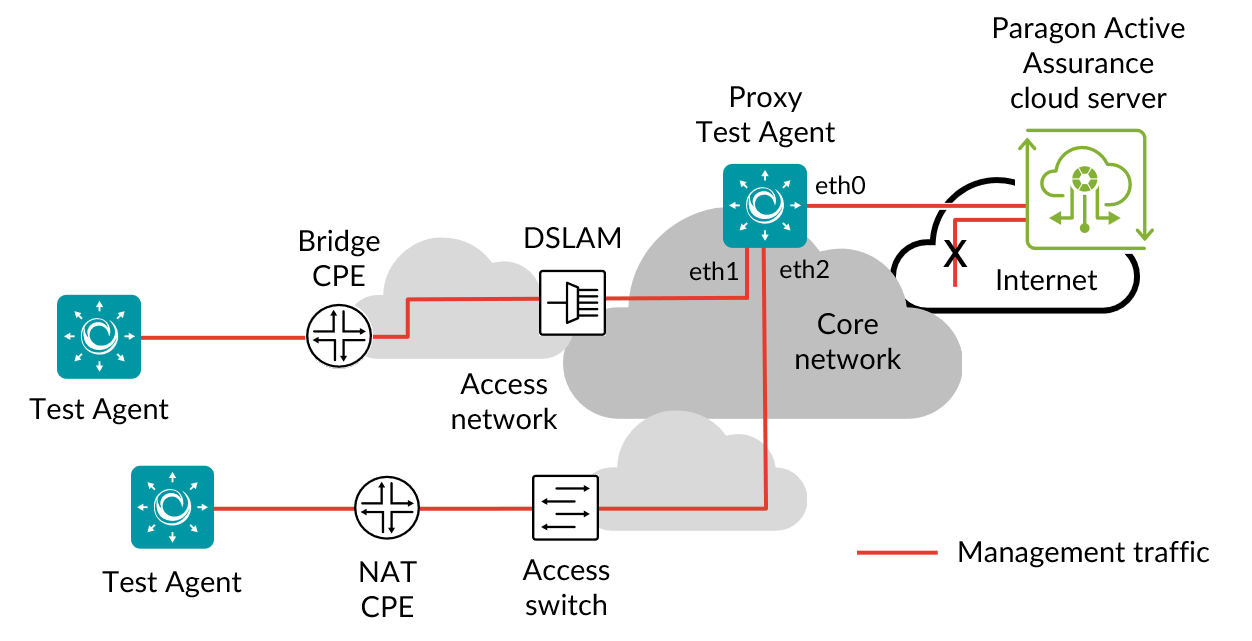
This page assumes that the Routing Active Testing server resides in the public cloud, as the use of a proxy is relevant mainly in that case. It is however possible to use a proxy with an on-premise Routing Active Testing server as well.
To set up and use a Test Agent as a proxy, follow these steps:
Allow Internet access for one of the interfaces on one of your Test Agents. This Test Agent is commonly placed in the server hall or core network.
Enable proxy on that Test Agent (called “proxy Test Agent” from now on):
In the Routing Active Testing user interface, navigate to Test Agents, and click the relevant Test Agent in this view.
Go to the Applications tab, and select the checkbox Proxy for management traffic for the management interface. (See also this page.)
We recommend that you configure a static IP address on the interface to which the other “internal” Test Agents connect, so that the address does not change unexpectedly as might happen when using DHCP.
Connect another interface (“eth1”, etc.) of the proxy Test Agent to the internal network that does not allow Internet connections.
For each of the other Test Agents that you want to be able to connect to the Internet via the proxy Test Agent, do the following:
Log in directly to the Test Agent (that is, not via the Routing Active Testing GUI).
If the Test Agent is already registered with the Routing Active Testing cloud server, go to Utilities > Change login server and change the login server from https://login.paa.juniper.net to the IP address of the proxy Test Agent interface (“eth1”, etc.) configured in step 2 (the internal address to the proxy). Under Port, enter the port used by the proxy Test Agent (e.g. 443).
If the Test Agent is not yet registered, do the registration according to this page.
(Optional:) Since the Test Agents need to have a working NTP synchronization, the NTP server likely has to be reconfigured. Do the following:
If you have your own NTP server, change the NTP server from time.google.com to your internal NTP server for all Test Agents, or:
Change the NTP server for all internal Test Agents from time.google.com to the IP address of the proxy Test Agent’s “eth1” interface, and let the proxy Test Agent continue to synchronize to time.google.com.
See the page Test Agent NTP configuration for more information about NTP.
The proxy functionality is now configured and ready to use. This allows the Test Agents to communicate with the Routing Active Testing cloud server via the proxy Test Agent, which forwards their traffic to the Routing Active Testing cloud.