Installing Test Agent Appliance on a fitlet2
This page explains how to install a Routing Active Testing Test Agent on a Compulab (► https://www.compulab.com) fitlet2 hardware server.
Obtaining the hardware components
Some Juniper resellers may be able to resell Compulab. Please ask your local Juniper reseller.
Alternatively, you can order preinstalled Test Agents
directly from Compulab: Email to sales@fit-iot.com
from a Compulab reseller: See https://fit-iot.com/web/resellers/
In your order, refer to the SKUs listed below.
Required components
fitlet2 is equipped with 2x1GE interfaces (Intel i211) with support for hardware timestamping.
Two hardware models are recommended: cost-optimized and performance-optimized. Their respective features appear from the table below.
The cost-optimized model is comparable to the PC Engines APU2.
The performance-optimized model is recommended for advanced use cases.
Feature |
Cost-optimized |
Performance-optimized |
|---|---|---|
CPU |
Intel Apollo Lake CPU |
Intel Apollo Lake CPU |
Atom x5-E3930 (2 cores) |
Atom x7-E3950 (4 cores) |
|
RAM |
4 GB |
8 GB |
Storage |
32 GB SSD |
32 GB SSD |
Chassis |
Standard |
Standard |
Temperature range |
Commercial |
Commercial |
Power supply |
Standard |
Standard |
Optional components
Two expansions are available: Wi-Fi and 2×1GE. Either of these can be used, but not both at the same time.
Wi-Fi expansion
Intel 8260AC
2×2 802.11ac for 2.4 and 5 GHz
Up to 867 Mbps
2×RP-SMA antennas
2×1GE expansion
Two additional 1GE interfaces
Intel i211
Provides a total of 4×1GE interfaces
SKUs
These SKUs refer to fitlet2 units with Test Agent software preinstalled, which is indicated by the suffix “-XJUN”.
SKUs without this suffix refer to fitlet2 units without Test Agent software.
Cost-optimized model
Expansion |
SKU |
|---|---|
None |
FITLET2-CE3930-D4-M32S-XJUN |
Additional 2×1GE interfaces |
FITLET2-CE3930-D4-M32S-FLAN-XJUN |
Additional Wi-Fi |
FITLET2-CE3930-D4-M32S-WI8260-XJUN |
Performance-optimized model
Expansion |
SKU |
|---|---|
None |
FITLET2-CE3950-D8-M32S-XJUN |
Additional 2x1GE interfaces |
FITLET2-CE3950-D8-M32S-FLAN-XJUN |
Additional Wi-Fi |
FITLET2-CE3950-D8-M32S-WI8260-XJUN |
Manually installing a Test Agent image on a fitlet2
These instructions apply if you have purchased a fitlet2 without Test Agent software preinstalled (see SKUs here) and you want to install the Test Agent image manually, or if you want to reset a fitlet2 to the factory default state.
Make sure the BIOS is set to boot in legacy boot mode. Make the following settings in the BIOS menu:
Advanced > CSM Configuration > CSM Support : [Enabled]
Advanced > CSM Configuration > Boot option filter : [Legacy only]
Advanced > CSM Configuration > Network : [Legacy]
Advanced > CSM Configuration > Storage : [Legacy]
Advanced > CSM Configuration > Video : [Legacy]
Advanced > CSM Configuration > Other PCI devices : [Legacy]
Boot > Boot Mode Selection : [Legacy]
Press the F4 key to Save & Exit.
Prepare a USB memory stick with a Test Agent image, then boot and install according to this instruction on this page.
Known issues
The RS232 serial console does not work with the fitlet2 device.
During boot, the errors “Invalid GROUP operation” and “Failed to find module ‘autofs4” are briefly displayed. They can be safely ignored.
Getting started with the Test Agent on fitlet2
Once the Test Agent is installed on the fitlet2, here is how to get started using it:
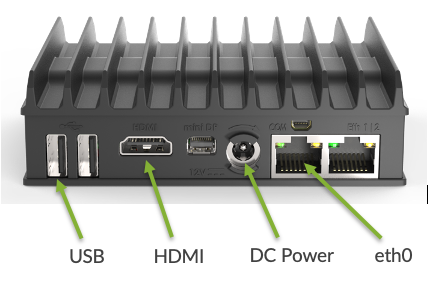
Connect an HDMI display, a USB keyboard, and power supply to the fitlet2 device.
Connect eth0 to a network. This is the Ethernet connector next to the DC power connector.
Start the fitlet2 by pressing the power button. After 1–2 minutes the login page should appear on the screen.
Register the Test Agent with a Control Center following the regular procedure.
Interface mapping
eth0 is the default management interface for a Test Agent configured for DHCP.
The physical ports of the fitlet2 map to interfaces in Routing Active Testing as laid out in the tables below.
No expansion installed
Physical port |
Interface name |
|---|---|
1 |
eth0 |
2 |
eth1 |
Wi-Fi expansion installed
Physical port |
Interface name |
|---|---|
1 |
eth0 |
2 |
eth1 |
Expansion |
wlan0 |
2×1GE expansion installed
Physical port |
Interface name |
|---|---|
1 |
eth0 |
2 |
eth1 |
Expansion |
eth2, eth3 |