Getting started with preinstalled Test Agents
Note
Test Agents are no longer delivered preinstalled on hardware. However, existing devices continue to be supported, and the present page is kept for reference.
The delivery will have contained the ordered combination of hardware devices, each with Test Agent software installed. Follow the steps below to prepare the Test Agents for use.
In some situations below, it is necessary to use the local administration console of the Test Agent. How to access that console is described here.
Unpack the Test Agents. Note that each Test Agent has multiple network interfaces, making it possible to use dedicated ports for management, testing and monitoring.
Each Test Agent must establish a secure connection to the Routing Active Testing server before you can use it through the management interface and port. All remote accessing and administration of your Test Agents are done through the Routing Active Testing server once the Test Agents have been registered and have come online.
If you are using your own on-premise Routing Active Testing server, you need to configure the Test Agent with the server address and port. This is done through the Test Agent local administration console. Use this function to set the login server to the Control Center host IP and the login server port to 6000.
Connect the Test Agent’s “eth0” interface (the default management interface) to an Ethernet access port on your network.
If you are using an on-premise Routing Active Testing server, make sure that the path between the Test Agent’s management interface and Control Center is not blocked on port 6000.
If you are using a cloud server account, make sure that the Test Agent has internet connectivity.
Once the Test Agent is powered on, it will request a DHCP address on the “eth0” interface.
If your network does not offer DHCP addresses, you need to specify a static IP address on the Test Agent. This is done through the Test Agent local console. Follow these instructions. If you want to use a physical interface other than “eth0” or a VLAN interface for Test Agent management, this is likewise done from the local console; again, details are found here.
Registration (on-premise server only): If you are using an on-premise Routing Active Testing server, register the Test Agent to the previously created Routing Active Testing account on the server. To this end, use the Register option in the Test Agent local console as explained here. (With a cloud server, the registration will be automatic, as explained below.)
After an IP address has been assigned, the Test Agent will connect to your specific Routing Active Testing account using the encryption keys that were preloaded into the Test Agent before delivery.
If you have a firewall in place, make sure that the Test Agent is allowed to establish an outgoing session towards the Routing Active Testing server:
in the cloud server case, to https://login.paa.juniper.net using TCP port 443 (Test Agent Appliance) or TCP port 6800 (Test Agent Application);
in the on-premise server case, to the host IP using TCP port 6000.
You do not need to allow any incoming connections, since the Routing Active Testing server will communicate with the Test Agent using the reverse direction on the same TCP session.
If you are making use of the Routing Active Testing cloud server, the Test Agent will now automatically register with the server and appear in your Routing Active Testing account.
Log in to your account in the Routing Active Testing GUI by entering your email address and password.
Check that the Test Agent is online by accessing the Test Agents view from the main menu. Here, an inventory of all your Test Agents is shown. Your Test Agent should have a green indicator next to it, signifying that it is online. See this page for full coverage of the Test Agents view.
A valid license is assigned to the preinstalled Test Agent by Routing Active Testing prior to delivery. To inspect this license, click the Test Agent and go to the License tab. Should no valid license exist after all, please contact Juniper Networks technical support at https://support.juniper.net/support/requesting-support.
The preinstalled Test Agent is now ready to use.
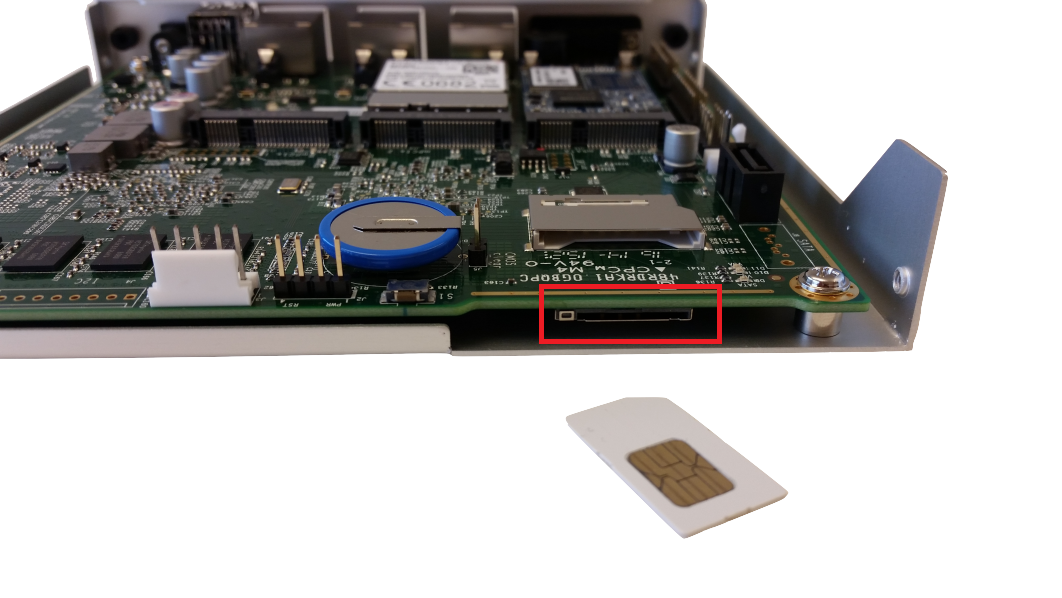
Installing a SIM card in HW Medium Mobile hardware
The photo below shows where to insert a SIM card in the “HW Medium Mobile” Test Agent hardware platform equipped with an LTE chip.
First remove the four screws at the side of the box to detach the cover.
Note
The SIM card must have its PIN code disabled, as there is no way to communicate a PIN from the Routing Active Testing user interface to the Test Agent.