# .. include:: ../../custom_roles.rst
Installing Test Agent Appliance on the Juniper Networks® NFX150 Network Services Platform
Overview
This document describes how to install a Test Agent Appliance on the NFX150-C-S1 Network Services Platform. The supported version of Junos OS is 22.1R1.
The NFX150 Network Services Platform provides multiple network connection options (including 4G/LTE) and an open, standards-based architecture. As a secure, universal customer premises equipment (uCPE) device, the NFX150 can support and manage multiple Juniper and third-party VNFs. For more information, go here: https://www.juniper.net/us/en/products-services/sdn/nfx-series/nfx150/
By default all command examples shown here are executed in the Junos OS CLI, which you can start by logging in to the NFX150 and running the command cli.
Physical layout of the NFX150
All NFX150 models have four 10/100/1000BaseT interfaces and two SFP/SFP+ interfaces, as well as a dedicated management interface.
In addition to this, the NFX150-S1 models have a module slot that can provide an additional eight 1 Gbps interfaces; these are currently not used by the Test Agent.
Legend:
1/2 – Serial port for NFX150 management.
3 – Dedicated management port (fxp0). Used for management of the NFX150 itself, but also possible to use from VNFs.
4 – General 10/100/1000BaseT Ethernet ports. Intel i350 NIC with SR-IOV support. Internally called heth-0-0 to heth-0-3.
6 – General SFP/SFP+ ports. Intel X553 NIC. Internally called heth-0-4 and heth-0-5.
Initial configuration
In this section, for convenience, we reproduce the instructions found here: https://www.juniper.net/documentation/en_US/junos/topics/topic-map/initial-configuration-nfx150.html
Connecting to the device
Login as root:
FreeBSD/amd64 (Amnesiac) (ttyu0)

login: root
Start the CLI:
root@:~ # cli
root>
Inspecting Junos OS version and hardware information
To display the Junos OS version:
show version | grep Junos:
If the Junos OS version is something other than 22.1R1, you need to update the firmware to that version as described in the next section.
To display information about chassis hardware:
show chassis hardware
Verify that the chassis description is “NFX150-C-S1”. This is the chassis supported.
Updating the NFX150 firmware (Junos OS)
Please refer to this page: https://www.juniper.net/documentation/en_US/junos/topics/reference/command-summary/request-vmhost-software-add-nfx-series.html
An alternative method is to install from USB according to the following document: https://kb.juniper.net/InfoCenter/index?page=content&id=KB32971
Enabling basic connectivity
Here you will change the root password and optionally enable root SSH access.
Ensure that the NFX150 device is powered on.
Connect to the console port:
Plug one end of the Ethernet cable into the console port on your NFX150 device.
Connect the other end of the Ethernet cable to the RJ-45-to-DB-9 serial port adapter shipped with your device.
Connect the RJ-45-to-DB-9 serial port adapter to the serial port on the management device. Use the following values to configure the serial port: Baud rate – 9600; Parity – N; Data bits – 8; Stop bits – 1; Flow control – None.
Note
Alternatively, you can use the USB cable to connect to the mini-USB console port on the device. To use the mini-USB console port, you must download the USB driver from the following page and install it on the management device: https://www.juniper.net/support/downloads/junos.html
Use any terminal emulation program, such as HyperTerminal, to connect to the device console. The CLI displays a login prompt.
Log in as root and enter the password
juniper123. If the software completes booting before you connect to the console, you might need to press the Enter key for the prompt to appear:Note
Starting with Junos OS Release 18.1R2 or later, the root password is not configured for initial configuration of the NFX150 devices.
login: root
password: juniper123
Start the CLI:
root@:~ # cli
root@>
Enter configuration mode:
root@> configure
[edit]
root@#
Change the password for the root administration user account:
[edit]
root@# set system root-authentication plain-text-password
New password: password
Retype new password: password
Enable SSH service for the root user:
[edit]
root@# set system services ssh root-login allow
(Optional) Enable the Internet connection for devices connected on LAN by setting the DNS IP:
[edit]
root@# set access address-assignment pool junosDHCPPool family inet dhcp-attributes name-server
dns-server-ip
Commit the configuration:
[edit]
root@# commit
Configuring LAN access on the NFX150 management port
The port labeled MGMT can be set up for remote management of the NFX150 device. This port is by default configured with a virtual interface called fxp0 which by default has the static IPv4 address 192.168.1.1. For further configuration of the device it is suitable to set up the fxp0 interface to give access to a Control Center, so that the device can download images and configuration files from there.
Below is an example of how to remove the existing static address and configure the virtual interface to use DHCP instead:
root> configure
root# delete interfaces fxp0 unit 0 family inet address 192.168.1.1/24
root# set interfaces fxp0 unit 0 family inet dhcp
root# commit
For more information on configuring the in-band management interface, refer to https://www.juniper.net/documentation/en_US/junos/topics/task/configuration/nfx150-configuring-inband-management-interface.html
Configuring a suitable virtualization mode for the Test Agent
To be able to dedicate as many CPUs as possible to the Test Agent VNF, you need to configure the device in a custom mode where the Layer 2 and Layer 3 infrastructure is disabled. The operation requires the device to be rebooted for the changes to be applied. Run the command below and then type “yes”.
root> configure
root# set vmhost mode custom paa layer-2-infrastructure offline
root# set vmhost mode custom paa layer-3-infrastructure offline
root# commit
root> request vmhost mode paa
Use this command to get more information about mode and settings:
root> show vmhost mode
Note that provisioning the interfaces to the VNF is done as part of configuring the VNF.
Configuring NTP
The NFX150 has an NTP client and server running. You need to configure NTP on the NFX150 as described here: https://www.juniper.net/documentation/en_US/junos/topics/task/configuration/ntp-configuring-nfx.html
Further, NTP needs to be configured as usual for the Test Agent. This can be done either from Control Center or from the Test Agent local console. Follow the links for instructions.
Configuring the Test Agent VNF
The management interface for the TA is eth1, which is bridged to the management port of the NFX150. The remaining interfaces are mapped to the physical ports of the NFX150.
The Test Agent VNF can be configured either manually or by means of a cloud-config template. The two methods are covered in turn below.
Configuring the Test Agent VNF manually
Ensure the NFX150 is in compute mode with L2 and L3 infrastructure disabled:
set vmhost mode custom netrounds layer-2-infrastructure offline
set vmhost mode custom netrounds layer-3-infrastructure offline

request vmhost mode netrounds
The system will prompt for a reboot if necessary.
Download the Test Agent image:
file copy https://<NCC address>/static/test_agent/paa-test-agent<current version number>.qcow2
  /var/public/
Create a directory for the VNF:
file make-directory /var/public/test-agent-vnf
Make a copy of the Test Agent image so that the original can be reused to restore the initial state:
file copy /var/public/paa-test-agent<current version number>.qcow2
  /var/public/test-agent-vnf/paa-test-agent.qcow2
Allocate hugepages:
edit
set system memory hugepages page-size 2 page-count 512
Create the VNF and set the image to be used:
edit virtual-network-functions testagent
set image /var/public/test-agent-vnf/paa-test-agent.qcow2
Pin the vCPU on the NFX-150-C-S1:
set virtual-cpu 0 physical-cpu 2
set virtual-cpu 1 physical-cpu 3
set virtual-cpu count 2
set virtual-cpu features hardware-virtualization
set virtual-network-functions testagent emulator physical-cpu 1
set virtual-network-functions testagent iothread 1 physical-cpu 1
set iothread count 1
In the NFX150 default configuration, interfaces are mapped to the vmhost. Remove these mappings so that they are free to use by the Test Agent:
delete vmhost virtualization-options
Map all physical interfaces to the VNF as SR-IOV interfaces:
set interfaces eth2 mapping interface heth-0-0 virtual-function
set interfaces eth3 mapping interface heth-0-1 virtual-function
set interfaces eth4 mapping interface heth-0-2 virtual-function
set interfaces eth5 mapping interface heth-0-3 virtual-function
set interfaces eth6 mapping interface heth-0-4 virtual-function
set interfaces eth7 mapping interface heth-0-5 virtual-function
Allocate memory to the VNF. (“1048576” = 1 GB is what is available on the NFX150-C-S1.)
set memory size 1048576
set memory features hugepages page-size 2
You are done. Commit the config. This should start up the VM:
commit
Access the Test Agent using the local console:
run request virtual-network-function console testagent
Register the Test Agent according to the instructions here.
Using the cloud config template to configure the Test Agent
As part of the Test Agent release, Juniper Networks also provides a base configuration and some template files for configuring the Test Agent VNF on the NFX150 device. This can be used to load the VNF configuration as well as the base for a config-drive used to set up the Test Agent; for example, to register and configure the management interface.
Before downloading the files, you need to ensure the NFX150 is in compute mode with L2 and L3 infrastructure disabled:
set vmhost mode custom netrounds layer-2-infrastructure offline
set vmhost mode custom netrounds layer-3-infrastructure offline

request vmhost mode netrounds
The system will prompt for a reboot if necessary.
Below are step-by-step instructions on how to set up the Test Agent. You can download the required files from the Control Center either using a script from root console or using the NFX150 CLI. The two possibilities are covered in separate subsections.
Downloading files using a script
To download the downloader script from Control Center, use the following command in the root shell of the NFX150.
curl --insecure https://<Control Center address>/static/test_agent/config-data/paa-get-files.sh --output paa-get-files.sh
Replace <Control Center address> with the address to the Control Center where you have an account.
Then execute the script to download the files needed for installation as follows:
sh paa-get-files.sh <Control Center address> <version>
Again, replace <Control Center address> with the address to the Control Center where you have an account, and replace <version> with the Test Agent version available for download from that Control Center.
After the download is complete, proceed to apply the configuration in the NFX150 CLI as explained here.
Downloading files using the NFX150 CLI
Download the Test Agent image to the device:
file copy https://<Control Center address>/static/test_agent/paa-test-agent_<current version
  number>.qcow2 /var/public/
Replace
<Control Center address>with the address of the Control Center where you have an account.<current version number>is the version number of the Test Agent hosted on the Control Center; a direct link to this can be found by clicking Test Agents on the navigation bar, then clicking the Download button.Set up a directory on the NFX150 file system where the Test Agent image will be stored:
file make-directory /var/public/test-agent-vnf
Make a copy of the Test Agent image. This lets you reuse the original if you want to redo the setup with a clean Test Agent. The copy is stored in the newly created directory.
file copy /var/public/paa-test-agent<current version number>.qcow2
  /var/public/test-agent-vnf/paa-test-agent.qcow2
Download the Test Agent VNF base configuration:
Choose a template matching the NFX150 device and configuration you are after. This is the config of the VNF on the NFX150 device. The config contains CPU pinning and mapping of interfaces to the Test Agent VNF. The following configs are available (please note again that Test Agent installation is currently supported only on the NFX150-C-S1 device):
Config file
Target device
CPUs
Memory (GiB)
TA-NFX150-C-S1_1-core.conf
NFX150-C-S1
1 (CPU2)
1
TA-NFX150-C-S1_2-core.conf
NFX150-C-S1
2
1
TA-NFX150-S1.conf
NFX150-S1
4
4
The 2 CPU configuration is recommended.
In the following example the config file
TA-NFX150-C-S1_2-core.confis downloaded:file copy https://<Control Center address>/static/test_agent/config-data/TA-NFX150-C-S1_2-core.conf /var/public/test-agent-vnf/
Create a config-data directory:
In order to pass cloud-config to the Test Agent, we need to set up a directory that will be mounted in the Test Agent and picked up by cloud-init as cloud-config. This drive setup is not tied to any specific Test Agent VNF instance, so you do not need to repeat these steps if you set up a new Test Agent on the device later on.
Create the directory where the config data will be stored in the NFX150 file system:
file make-directory /var/public/ta-config-drive
Then download the cloud-init user-data template specific to Junos OS and a static metadata file that will be used to pass config to the Test Agent VNF instance:
file copy https://<Control Center address>/static/test_agent/config-data/user-data.template
  /var/public/ta-config-drive/
file copy https://<Control Center address>/static/test_agent/config-data/meta-data
  /var/public/ta-config-drive/
Applying the configuration
It is now time to apply the configuration to the device and spin up the Test Agent.
Enter configuration mode on the NFX150 CLI:
configure
Load the configuration that you have downloaded:
Note
If you are configuring some other device than the *-C-S1 with 2 CPUs, the file name will be different.
load set /var/public/test-agent-vnf/TA-NFX150-C-S1_2-core.conf
You can inspect what has been configured so far by running
show | compare
Before you commit the configuration you need to set the required parameters that will be part of the cloud config. Below, in order to make the configuration commands shorter, we edit the configuration at the parameters level of the config. This is where the registration information and management interface configuration are set.
Navigate to the parameters subelement:
edit virtual-network-functions testagent config-data source template cloud-config parameters

[edit virtual-network-functions testagent config-data source template cloud-config parameters]
   root#
Configure the required parameters:
The file user-data.template holds descriptions of all available parameters. You can show these by running
run file show /var/public/ta-config-drive/user-data.template
Setting the required registration information
Run these commands:
set name <Test Agent name>
set server <Control Center server address>
set email <email>
set password <password>
set account <account>
Values enclosed in angle brackets <> should be replaced with information specific to your account. For example, naming the Test Agent “NFX-demo” would be done by typing:
set name NFX-demo
Setting the management interface configuration
The default management interface on the NFX150 device is preset to eth1 in the provided VNF config. Therefore, if you do not set any cloud-config parameters in the CLI, the Test Agent will use eth1 with DHCP as default address config. Below are some examples of how to configure this differently:
Suppose you want to use eth2 for management and configure a static address. While editing the config at virtual-network-functions testagent config-data source template cloud-config parameters, run these commands:
set management_interface eth2
set management_address_type static
set management_ip 10.0.0.10/27
set management_dns 10.0.0.1
set management_default_gateway 10.0.0.1
Refer to the template file for the complete set of available config parameters.
Committing the configuration
Before committing the config it is a good idea to verify that the config is correct. Do this by running
show
Once you are satisfied with the configuration, commit it:
commit
This will apply the configuration and start the Test Agent VNF. The Test Agent should then take the config passed from the CLI and register to the configured Control Center.
Fetching system information
You can inspect the current system configuration of the NFX150 with the command
show configuration virtual-network-functions testagent
This command can be used to display information about CPU configuration:
show system visibility cpu
Here is how to view information on memory:
show system visibility memory
For further information, see https://www.juniper.net/documentation/en_US/junos/topics/reference/command-summary/show-system-visibility-cpu-nfx-series.html
Managing VNFs on the NFX150 device
How to start, stop, restart, and get console access to VNFs is covered on this page:
https://www.juniper.net/documentation/en_US/junos/topics/topic-map/managing-vnfs-nfx-series.html
Note
Whenever you modify the configuration of the Test Agent VNF, you need to restart it for the changes to take effect.
Console access to VNFs
To get a serial console for a VNF, use the following command:
request virtual-network-function console <vnf-name>
For the Test Agent, this becomes
request virtual-network-function console testagent
(as mentioned in the section on manual VNF configuration). Continue according to this page.
Note
The request virtual-network-function console command is supported only for root login over SSH.
Junos OS upgrade/recovery
If the Test Agent installation fails, we recommend reinstalling Junos OS from USB according to the document “Performing a USB upgrade on NFX150” which is found here: https://kb.juniper.net/InfoCenter/index?page=content&id=KB32971
By contrast, performing a factory reset is not recommended.
Interface mapping
In the provided configuration example and templates, all physical ports of the NFX150 are made available to the Test Agent VNF as shown in the table below.
Test Agent interface |
Physical port |
Internal name |
|---|---|---|
eth0 |
Internal management |
– |
eth1 |
Shared with management port |
fxp0 |
eth2 |
Port 1 (1 Gbps) |
heth-0-0 |
eth3 |
Port 2 (1 Gbps) |
heth-0-1 |
eth4 |
Port 3 (1 Gbps) |
heth-0-2 |
eth5 |
Port 4 (1 Gbps) |
heth-0-3 |
eth6 |
Port 5 (10 Gbps) |
heth-0-4 |
eth7 |
Port 6 (10 Gbps) |
heth-0-5 |
Further information on how to configure the interface mapping on the NFX150 can be found here: https://www.juniper.net/documentation/en_US/junos/topics/topic-map/interface-mapping-nfx150.html
Updating the Test Agent software version
No special steps are needed when updating a Test Agent running on this platform. The procedure is the same as on all other platforms and is handled from Control Center. See this page.
Connecting the Test Agent to the Layer 3 dataplane
If Layer 3 traffic is being routed via the NFX150, it can be useful to connect a virtual interface on the Test Agent to the L3 dataplane. For this purpose, a virtio interface is mapped to a VLAN and attached to the Test Agent. One of the ge-1/0/x interfaces is configured on the same VLAN with an IP address that the Test Agent can use as a gateway. The image below shows an example.
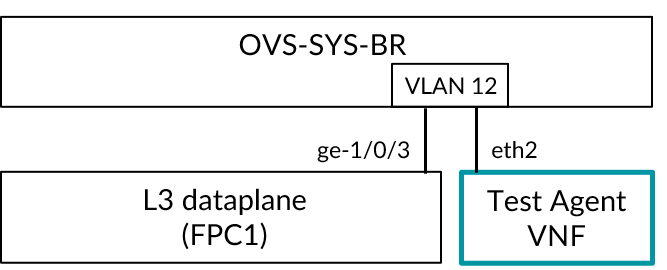
Create the VLAN:
set vmhost vlans vlan12 vlan-id 12
Attach an interface from FPC1 to the OVS bridge. On the NFX150,
ge-1/0/0is already attached, but any of the otherge-1/0/xinterfaces can also be attached.set vmhost virtualization-options interface ge-1/0/3Add a logical interface to the interface and map it to the VLAN:
set interfaces ge-1/0/3 vlan-tagging
set interfaces ge-1/0/3 unit 12 vlan-id 12
Add the gateway address:
set interface ge-1/0/3 unit 12 family inet address 192.168.12.1/24
Add the interface to the
trustsecurity zone:set security zones security-zone trust interfaces ge-1/0/3.12Map the virtio interface to the VLAN (we are assuming here that the VNF is named
testagent):set virtual-network-function testagent interfaces eth2 mapping vlan members vlan12Commit.
From Control Center, configure
eth2on the Test Agent with an address from the 192.168.12.0/24 subnet and gateway 192.168.12.1.
Removing the Test Agent VNF from the NFX150 device
All of the following steps are executed from the NFX150 CLI.
First stop the instance:
request virtual-network-function stop testagent
Enter configuration mode and delete the config for the VNF:
root> configure
Entering configuration mode

[edit]
root# delete virtual-network-functions testagent

[edit]
root# commit
If you want to set up a new Test Agent later on, it is important to replace the image file that was used since the image will otherwise hold the state of the deleted Test Agent:
file copy /var/public/paa-test-agent_<current version number>.qcow2
  /var/public/test-agent-vnf/paa-test-agent.qcow2
Then follow the instructions under Applying the configuration to set up a new Test Agent.
Known platform limitations
There are currently certain limitations on the testing that is possible on the NFX150-C-S1 platform.
The single-core architecture limits the throughput, as detailed on this page.
The number of VLANs is limited to 31 for 1 Gbit/s interfaces and to 63 for 10 Gbit/s interfaces.
Forwarding through a bridge is not supported.
The IPTV inline task type, using the configuration described in the present documentation, is not supported as it relies on a bridge.
802.1x authentication is not supported on the NFX150 management interface (
fxp0). It is however supported on the test interfaces, and does not require any special configuration of the NFX150. How to configure 802.1x authentication on the Test Agent is explained here.Transparency tests are limited on test interfaces, as detailed below. The tests are all supported on the NFX150 management port (
virtio).Testing with jumboframes is not possible on the NFX150 management port. It is supported on the test interfaces.
Separate IP addresses are needed for management of the NFX150 and of the Test Agent.
Details on transparency tests
Test type |
Sender |
Receiver |
||||||
|---|---|---|---|---|---|---|---|---|
ethX |
ethX.x (VLAN interf.) |
ethX |
ethX.x (VLAN interf.) |
|||||
1G |
10G |
1G |
10G |
1G |
10G |
1G |
10G |
|
Custom VLAN |
Fail |
Fail |
Pass |
Pass |
Fail |
Fail |
Pass |
Pass |
Ethertypes |
Pass |
Pass |
Pass |
Pass |
||||
MAC address limit |
Fail |
Fail |
Fail |
Fail |
Pass |
Pass |
Pass |
Pass |
VLAN |
Fail 2 |
Fail 2 |
N/A |
N/A |
Fail 2 |
Fail 2 |
N/A |
N/A |
Custom Ethertypes |
Pass |
Pass |
||||||
DSCP remapping |
Pass |
Pass |
Pass |
Pass |
Pass |
Pass |
Pass |
Pass |
IPv6 |
Pass |
Pass |
Pass |
Pass |
Fail 5 |
Fail 5 |
Fail 5 |
Fail 5 |
IP |
Pass |
Pass |
Pass |
Pass |
Fail 6 |
Fail 6 |
Fail 6 |
Fail 6 |
Multicast |
Pass |
Fail 7 |
Pass |
Fail 7 |
Fail 8 |
Fail 8 |
Fail 8 |
Fail 8 |
Ethernet control protocols |
Pass |
Fail 9 |
Pass |
Fail 9 |
Fail 10 |
Fail 10 |
Fail 10 |
Fail 10 |
- 1(1,2,3,4)
Not CDP, Cisco VTP/DTP, or CGMP.
- 2(1,2,3,4)
All QinQ tests pass.
- 3(1,2)
Passes only when source MAC matches that of sending interface.
- 4(1,2,3,4)
Passes only when destination MAC matches that of receiving interface.
- 5(1,2,3,4)
Fails on MLD, MLDv2, neighbor solicitation, router solicitation, DHCP solicitation.
- 6(1,2,3,4)
Fails all multicast.
- 7(1,2)
STP and LLDP fail.
- 8(1,2,3,4)
Fails STP, LLDP, Ethernet configuration test protocol and MPLS (except MAC 01:00:5E:80:00:01).
- 9(1,2)
Link Aggregation Control Protocol fails.
- 10(1,2,3,4)
Only EAP test passes.
Reference performance
See this page.