Setting up SIP accounts
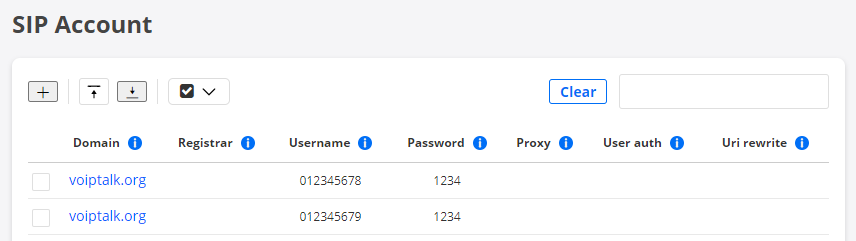
Configuration of SIP accounts is done under Account > SIP accounts.
SIP testing is performed by the user-agent on a Test Agent placing SIP calls to other Test Agents and measuring call setup time (among other parameters). When the call is terminated, the call hangup time is measured.
Read more about SIP testing here.
To do this testing, you need to have at least two SIP accounts registered. The SIP account used for a particular Test Agent is selected when the test or monitor is started, so each SIP account can be used for any Test Agent.
The SIP tool supports overwritten URIs. This means that the tool handles the situation where a SIP proxy server changes the original SIP URI during a call.
To set up a new SIP account manually, click the Add button:
Fill in the account credentials:
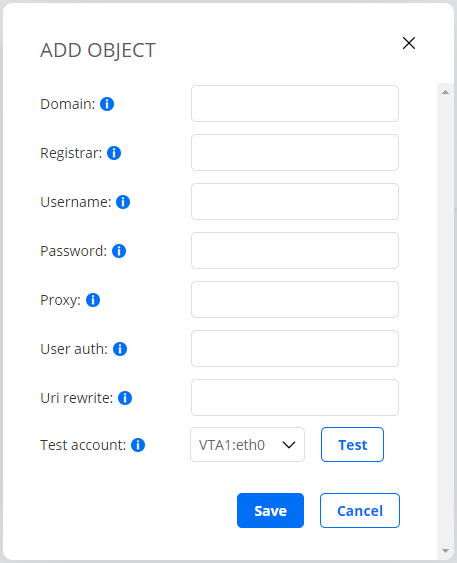
Domain: The name of the SIP domain.
Registrar: (Optional) The domain name or IP address of the SIP registrar. If empty, the domain name will be used.
User name: The user name needed for registration.
Password: The password needed for registration.
Proxy: (Optional) The proxy server to use.
User auth: (Optional) The user ID needed for authentication.
URI rewrite: (Optional) The rewritten user ID of a SIP account used as caller (client). Some SIP servers will rewrite the user name part of the caller’s URI.
In that case the rewritten user name must be specified here, so that the hub Test Agent can correctly identify the incoming call. The format of the input may be eitherusernamealone orusername@domain.Test account: Here you can test the SIP account. Select a Test Agent interface in the drop-down box, then click the Test button.
After testing the SIP account, click the Save button to save the configuration.
Uploading SIP accounts as a CSV file
Alternatively, instead of entering SIP accounts manually in the user interface, you can upload a list of SIP accounts as a comma-separated file with extension .csv.
Click the up-arrow button at the top of the view.
In the dialog that opens, select the desired CSV file.
The CSV file must have one SIP account per line, defined according to the following syntax:
domain, registrar, user_name, password, proxy, user_auth, uri_rewrite
For full CSV file syntax requirements, see this page.
Please make sure that the file is encoded in UTF-8 format. The encoding can be specified in the text editor settings.
Warning
Uploading a new SIP account list will overwrite all existing SIP accounts. Items not included in the new uploaded list will be removed, which will cause all current and historical measurement data associated with those SIP accounts to be deleted.
Exporting SIP accounts to a CSV file
You can export the list of defined SIP accounts to a CSV file.
Click the down-arrow button at the top of the view.
A CSV file is now exported to the Downloads folder on your machine.
The exported file will adhere to the specifications given on the CSV file syntax page, and it will be encoded in UTF-8.