Setting up alarms
Alarm and SNMP configuration is done under Account > Alarms. Specifically, the items configured are:
SMNP managers
Email lists
Alarm templates
Automatic alarm suppressions
SNMP Manager settings
Routing Active Testing can send SNMP traps to an SNMP manager whenever the SLA is violated during a monitoring session. Routing Active Testing supports SNMP version 2c as well as the more secure SNMP version 3.
Note
The SNMP traps, regardless of SNMP version, are sent from the host where Control Center is installed (in the SaaS case, from https://app.netrounds.com), by default using the standard port for SNMP traps (UDP port 162). The port can be changed. No traps are sent directly from Test Agents.
The Routing Active Testing alarm MIB can be downloaded from https://www.juniper.net/documentation/us/en/software/active-assurance/mibs/paragon-active-assurance-mibs.zip.
When setting up a monitor, you select which SNMP manager should receive alarm traps.
Here is how to set up a new SNMP manager:
Select the SNMP Manager tab.
Click the button Add Manager.
In the dialog that appears, select SNMP version: v2c or v3.
Further parameters for SNMP version v2c are as follows:
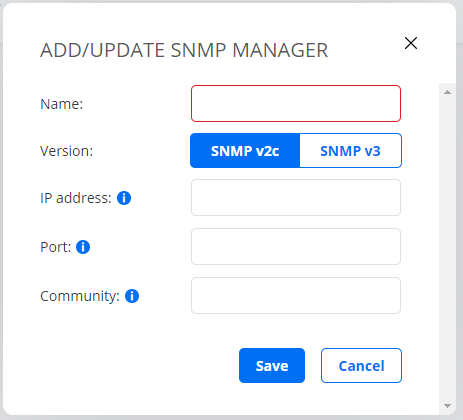
IP address: The IP address of your SNMP manager (trap sink).
Port: Port on which to send SNMP traps (trap sink).
Community: The community string used for authentication.
For SNMP version 3, a couple more parameters need specifying:
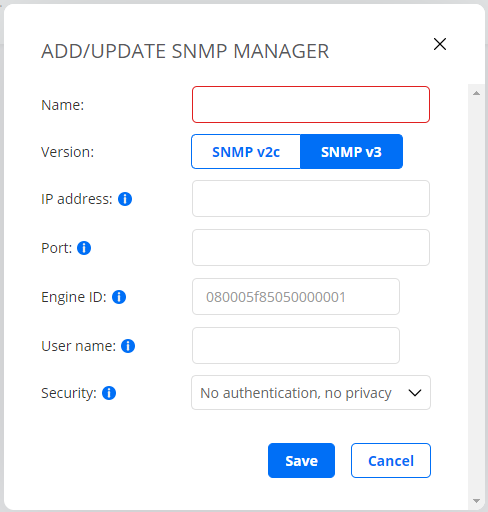
IP address: The IP address of your SNMP manager (trap sink).
Port: Port on which to send SNMP traps (trap sink).
Engine ID: The engine id to use. This identity should be the same in Routing Active Testing and in your SNMP manager.
User name: The user name to supply for authentication.
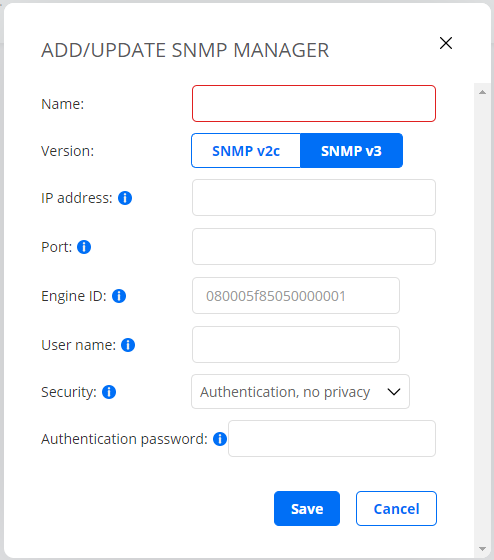
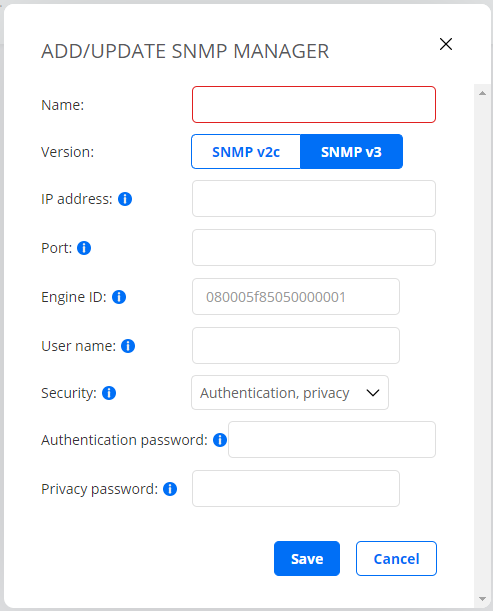
Security: The security level to use when sending traps. SNMPv3 defines three levels of security:
No authentication, no privacy
Authentication, no privacy
Authentication, privacy
If you select the security level Authentication, no privacy, you need to provide a password for authentication. The password must be at least 8 characters in length. The authentication protocol is MD5.
If you select the security level Authentication, privacy, you need to provide a password for privacy (= encryption of the SNMP trap). The password must be at least 8 characters in length. The privacy protocol is DES.
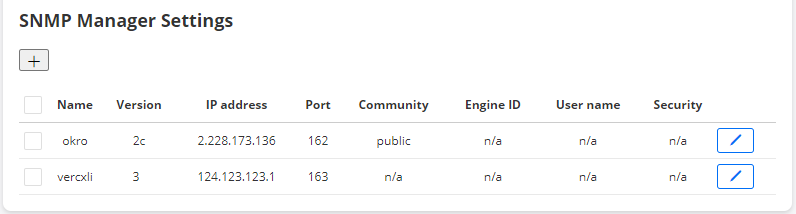
The picture below shows an example of SNMP manager settings for the two SNMP versions supported.
Email settings
As an alternative to SNMP traps, you can have alarms sent by email. You set up an email list in the alarm settings and point to that list when setting up a monitor. An email will then be sent to all email addresses on the list whenever one of the following happens:
an alarm is raised (some SLA threshold violated), or
the severity level of the alarm changes, or
the alarm is cleared (ES level back below SLA threshold).
To set up an email list:
Select the Email tab.
Click the button Add Email List.
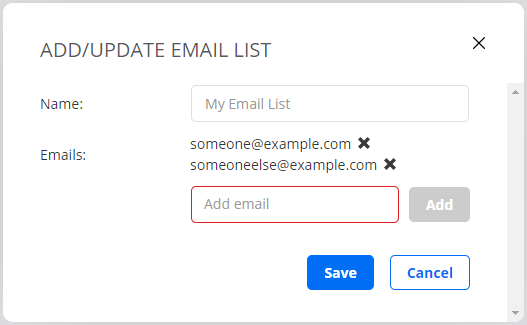
Name: Enter a name for the email list.
Emails: Enter one email address at a time, clicking the Add button after each. Click the cross next to an added email address in order to remove it.
Alarm templates
Alarm templates are used to predefine alarm conditions.
To set up such a template:
Select the Template tab.
Click the button Add Template and configure the parameters as described below.
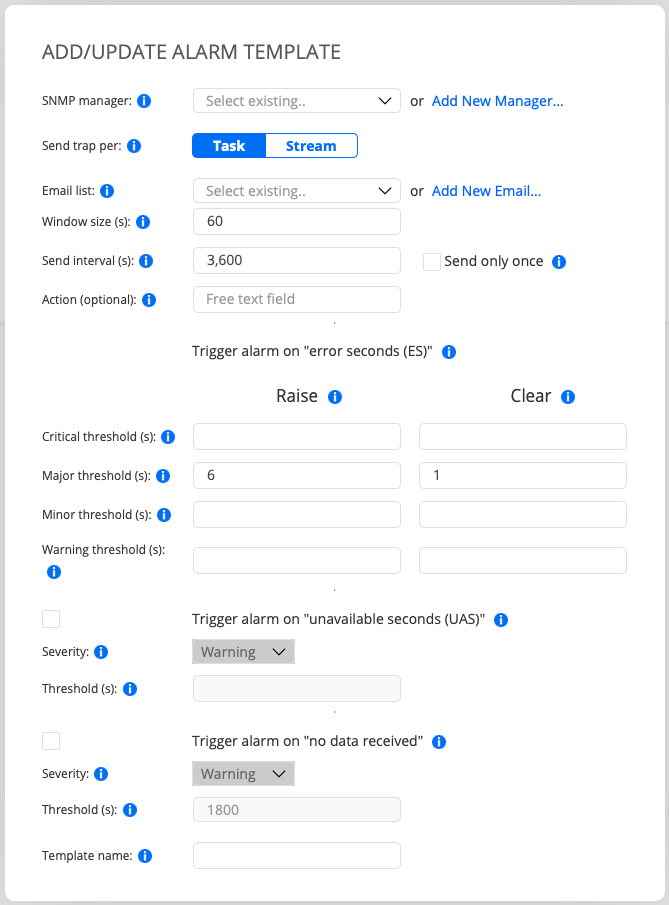
SNMP manager: SNMP manager to send alarms to.
If you want to set up a new SNMP manager, read about the settings here.Send trap per: Choose whether to send one SNMP trap per monitor task or one per stream in the monitor.
Email list: Email list to send alarms to.
If you want to set up a new email list, read about the settings here.
Note
You can select either an SNMP manager, or an email list, or one of each.
Trigger alarm on errored seconds
The thresholds in this section are used to evaluate whether to trigger an alarm for excessive violation of SLA criteria, and if so which severity the alarm should have.
For each severity level, an alarm is raised if the number of errored seconds reaches the Raise threshold within the sliding time window, and the alarm is cleared if the number of errored seconds drops below the Clear threshold within the window.
Window size (s): The size of the sliding window used when calculating the errored second count to be compared to the SLA thresholds.
Send interval (s): The interval between resending of alarms if no change has occurred in severity.
Select the Send only once checkbox if you want to send the alarm only once, disabling the Send interval setting. Default: 3600 seconds = 1 hour.Send only once: Only send the alarm once instead of at an interval.
Critical threshold (s): Raise and clear thresholds for alarms with severity “Critical”. No defaults.
Major threshold (s): Raise and clear thresholds for alarms with severity “Major”.
Defaults: Raise 6 ES, Clear 1 ES.Minor threshold (s): Raise and clear thresholds for alarms with severity “Minor”. No defaults.
Warning threshold (s): Raise and clear thresholds for alarms with severity “Warning”. No defaults.
Note
If the monitor contains multiple tasks, these criteria are applied to each task separately, not to the monitor as a whole. One task in a monitor can thus trigger an alarm even if no thresholds are exceeded for the other tasks.
Example of alarm triggering: If Window size is set to 60, and the threshold for raising a critical alarm (Critical threshold/Raise) is 10, this means that a critical alarm will be raised if 10 or more errored seconds have occurred during the last 60 seconds.
To avoid frequent on/off toggling of alarms, you should set the Clear threshold lower than the Raise threshold for a given severity (even though it is possible to set them equal).
Action (optional):
This is a free-text field where you can suggest an action to be performed when an alarm is raised. The Action text will be included in each sent email or SNMP trap. One way to use this field is to add a link to a test (for example,https://<host IP>/<account>/testing/12345) which the recipient of the alarm should run in order to troubleshoot the problem.
Trigger alarm on “no data received”
This section defines an alarm which is triggered when some task in a monitor has not delivered any data for a specified length of time.
This type of alarm is optional; select the checkbox next to the heading to enable it.
Trigger alarm on “no data received”: Enables triggering of an alarm if no data is received. This must be enabled for the settings below to apply.
Severity: Select a severity for the alarm. One of: “Warning”, “Minor”, “Major”, or “Critical”.
Threshold (s): Time to wait for a monitor task to resume delivery of data before raising an alarm.
Default: 1800 seconds = 0.5 hours.
Alarm template name
Template name: Enter a name for the alarm template here.
Using alarm templates
After you have created an alarm template, you can use it to configure alarms when creating a new monitor. This is described here.
Suppressing alarms
It is possible to suppress an alarm during a specified time interval. No alarms will then be sent even if thresholds are exceeded. This function is useful if a monitoring session or a Test Agent is temporarily affected by maintenance or other planned work.
To set up an alarm suppression:
Select the Suppression tab.
Click the button Add Suppression and configure the parameters as described below.

Name: Enter a name for the alarm suppression.
Monitor: The monitors the suppression should apply to.
Test Agent: The Test Agents the suppression should apply to.
Start/end date, Start/end time: The time interval during which the suppression will be in effect (for example, a maintenance window).
Finish by clicking Save. The suppression is now activated and will suppress alarms during the specified period.