Deploying a virtual Test Agent in OpenStack
Introduction
This page explains how to deploy virtual Test Agents (vTAs) from Routing Active Testing in OpenStack and how to control these from Routing Active Testing Control Center.
In ETSI NFV terminology, these vTAs are likewise referred to as Virtual Test Agents, and the centralized controller is referred to as the combination of Test Controller (TC) and Test Result Analysis Module (TRAM).
This guide assumes that you have a basic knowledge of OpenStack and Network Function Virtualization (NFV), and that you have your own OpenStack environment in which to launch the vTA images.
Prerequisites
Control Center account
You need an account in a Routing Active Testing Control Center in order to access it: either the one belonging to the Routing Active Testing SaaS solution or one installed on-premise in your organization. If you do not already have a Routing Active Testing account, please contact your Juniper partner or your local Juniper account manager or sales representative.
vTA image
The VNF vTA image is provided either by Juniper’s partners or directly from Juniper.
The vTA image for OpenStack is provided in either raw or QCOW2 format.
Launching the vTA image in OpenStack
Uploading the vTA image to OpenStack
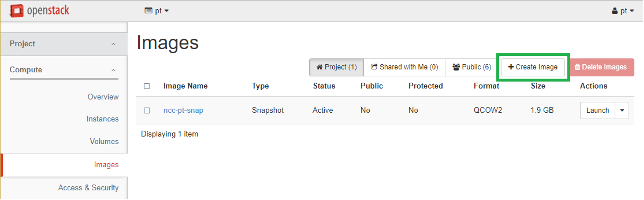
First you need to upload the vTA image to your NFV/OpenStack platform. In OpenStack’s Horizon GUI, do the following:
On the navigation bar on the left, expand Project, and under Compute, click Images.
Click the Create Image button. Fill out the dialog that appears, and create the image.
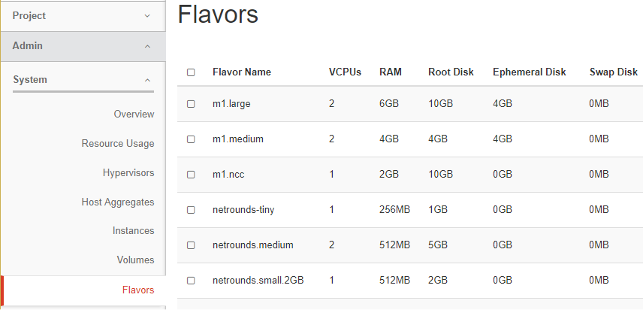
Creating a flavor for the vTA image
Flavors in OpenStack are virtual hardware templates, defining RAM allocation, block storage, and number of CPU cores. In the Horizon GUI, flavors are shown and created under Admin > System > Flavors.
The minimum recommended flavor for a vTA is:
1 vCPU
512 MB RAM
2 GB block storage
See below for some examples of flavors, including one called “netrounds.small.2GB” which corresponds to the above specifications.
Launching an instance of the vTA image
The final step is to launch an instance of the vTA image in OpenStack. Things will look a bit different depending on whether you are using a HEAT Orchestration Template (HOT), which is essentially a virtual machine descriptor, or whether you are specifying the details when launching the vTA. See below for instructions on how to launch the vTA:
manually – see this section
using HOT automation – see this section
using the Python OpenStack API – see this section.
Once you have launched the vTA image, the vTA will register with Control Center and appear in its web GUI under Test Agents. Check for the vTA name in that view to verify that the vTA has registered. You can then initiate tests and monitoring sessions on the vTA from Control Center.
Launching a vTA image manually in Horizon
Here is how to deploy a vTA manually, without using a HEAT Orchestration Template.
On the navigation bar, select Project > Compute > Instances. Then click Launch instance.
Under Details, enter a name for the vTA instance.
Under Source, select the image to boot the vTA instance from. In general, the default volume settings can be kept.
Under Flavor, select a suitable flavor for the vTA. Please refer back to this section.
Under Networks, select whatever is most appropriate in your case.
The Network Ports section can be skipped.
Under Security Groups, the group selected must satisfy the following:
The vTA must be able to establish an outgoing session towards its Control Center: in the cloud server case, to https://login.paa.juniper.net using TCP port 443; in the on-premise server case, to the host IP using TCP port 6000 (default).
UDP port 123 must be open to permit NTP time sync.
Traffic must be allowed on all ports needed for the testing you intend to do with the vTA.
The Key Pair section can be skipped, as SSH is not in use for vTAs.
Under Configuration, in the Customization Script box, you need to enter “cloud-config” metadata specifying among other things how to connect to Control Center. The format of this metadata is given below.
The Server Groups, Scheduler Hints, and Metadata sections can be skipped.
Finish by clicking the Launch Instance button at the bottom of the dialog.
A vTA image can also be deployed from the command line, but that method is not explained further in this introductory guide.
Format of “cloud-config” metadata
The vTA supports only #cloud-config metadata. Its format is as shown below.
Note
The #cloud-config and paa_test_agent lines must be present, and that all of the remaining lines must be indented.
Basic configuration:
#cloud-config
paa_test_agent:
  name: MyvTA                                   # vTA name
  email: john.doe@example.com                   # NCC user email
  password: secret                              # NCC user password
  account: theaccount                           # NCC account
  server: login.paa.juniper.net:443             # Login server
  management_interface: eth0                    # Test Agent management interface
  management_address_type: dhcp                 # Can be "dhcp" or "static"
The following parameters are required only if management_address_type is “static”:
## Set the following if using "static" above:
# management_ip: 192.168.1.2/24               # Management IP address
# management_dns: 8.8.8.8, 8.8.4.4            # DNS server IP address(es)
# management_default_gateway: 192.168.1.1     # Gateway IP address
# management_ntp: time.google.com             # NTP server IP address or host name
The following parameters are required only if the vTA is connecting to the server through an HTTP proxy:
## Set the following if using an HTTP proxy:
# http_proxy: myproxy.lan                     # Proxy server
# http_proxy_port: 80                         # Proxy port
# http_proxy_auth_type: none                  # Can be "none" or "basic"
The following parameters are required only if http_proxy_auth_type is “basic”:
# http_proxy_username: johndoe                # Proxy authorization user name
# http_proxy_password: secret                 # Proxy authorization password
The following parameters are required if IPv6 is to be used for Test Agent management connections:
## Note: IPv6 management requires special config, see separate documentation
# management_enable_ipv6: False
# management_ntp_allow_ipv6: False
# management_address6_type: none              # Can be "dhcp", "slaac", or "static"

## Set if "static". Note: Use CIDR format for IP
# management_ip6: 2001:db8:85a3::8a2e:370:7334/64
# management_dns6: 2001:4860:4860::8888, 2001:4860:4860::8844
# management_default_gateway6: <gateway IP address>
Launching a vTA image using a Heat Orchestration Template in Horizon
To deploy a vTA image in OpenStack using a Heat Orchestration Template (HOT):
On the navigation bar, select Project > Orchestration > Stacks.
Click the Launch Stack button on the far right. Select the HOT file to be used. For an example of such a file, see this section.
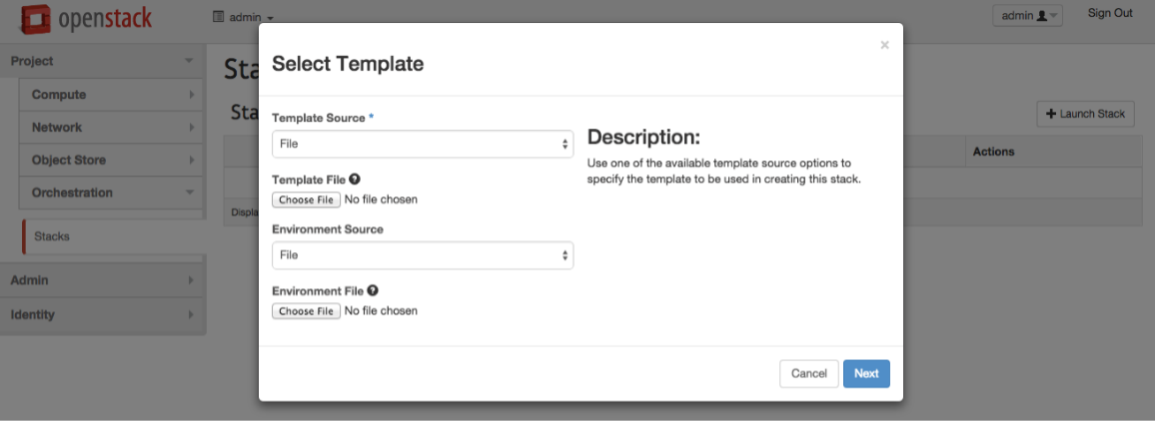
The template will ask for input to be specified, as shown in the following screenshot:

Some of these fields have default values, as defined in the HOT file, while others are variables in the template.
After a vTA image has been booted up, it must receive its instance-specific userdata/metadata so that it can properly configure the network interfaces and call back home to Control Center. The vTA supports two ways to provide this instance-specific data:
Requesting the data from a service running at http://169.254.269.254 on the compute host. This is similar to the approach taken by an EC2 instance running in AWS.
Reading the data from a special configuration drive that is attached to the vTA instance when it boots. This is referred to as the “config-drive method”.
The format of the instance-specific userdata/metadata is given in this section.
Using either of the above methods, it is possible to automate connecting the vTA to Control Center.
Note
You need to ensure that the vTA can establish an outgoing session towards its Control Center: in the cloud server case, to https://login.paa.juniper.net using TCP port 443; in the on-premise server case, to the host IP using TCP port 6000 (default). Alternatively, the vTA may connect via an HTTP proxy. In addition, UDP port 123 needs to be open to permit NTP time sync.
Example of HOT file
An example of a HOT file is provided below. Replace the [text in square brackets] with your input.
heat_template_version: 2015-07-15

description: Heat template to deploy a single vTA in OpenStack
parameters:
        account_name:
                type: string
                description: Routing Active Testing account name to be used for autoregistration
        email:
                type: string
                description: User name (email address) for Routing Active Testing account
        account_password:
                type: string
                hidden: true
                description: Routing Active Testing account password to be used for autoreg
        vTA_name:
                type: string
                description: Name to display in Routing Active Testing inventory
                default: vTA1
        image_id:
                type: string
                label: Image ID
                description: Image to be used for compute instance
                default: [Replace with vTA image name in your OpenStack env]
        instance_type:
                type: string
                label: Instance Type
                description: Type of instance (flavor) to be used
                default: [Replace with flavor that suits vTA]
        vTA_network:
                type: string
                label: vTA network attach
                default: [Replace with network that vTA attaches to]
                description: vTA test interface attached to this network
resources:
        vTA:
                type: OS::Nova::Server
                properties:
                        key_name: Operations
                        image: { get_param: image_id }
                        flavor: { get_param: instance_type }
                        networks:
                        - network: management
                        - network: { get_param: vTA_network }
                        user_data_format: RAW
                        user_data:
                                str_replace:
                                  template: |
                                    email: $email
                                    password: $password
                                    account: $account_name
                                    server: login.paa.juniper.net:443
                                    name: $vTA_name
                                  params:
                                    $email: { get_param: email }
                                    $password: { get_param: account_password }
                                    $account_name: { get_param: account_name }
                                    $vTA_name: { get_param: vTA_name }
Launching a vTA image using the Python OpenStack API
It is possible to use the OpenStack Nova and Keystone Python APIs to automatically launch the vTA image from a Python script:
def create_instance(net, vta_name, os_password):
#connect using credentials
creds = get_nova_creds(os_password)
nova = nvclient.Client(**creds)

#get image, flavor, network/nics
image = nova.images.find(name="vTA_cloudinit_image")
flavor = nova.flavors.find(name="netrounds.small.2GB")

network = nova.networks.find(label=net)
nics = [{'netid': network.id}]

# Create instances; requires cloudinit on vTA images
instance = nova.servers.create(name=vta_name, image=image,\
flavor=flavor, key_name="default", nics=nics,\
userdata=open("./userdata.txt")
The cloud-init file (user-data) in userdata.txt above has this content:
#cloud-config
paa_test_agent:
email: [email you use when logging in to Routing Active Testing]
password: [Routing Active Testing login password]
account: [Routing Active Testing account]
server: [Control Center address; for SaaS: login.paa.juniper.net:443]
name: [Name of vTA to appear in Control Center inventory]
Note again that the #cloud-config and paa_test_agent lines must be present.
Please contact Juniper support at https://support.juniper.net/support/requesting-support to get example Python code.