Deploying an AMI Test Agent in AWS
Introduction
This page explains how to deploy a Routing Active Testing Test Agent in Amazon EC2 (Elastic Compute Cloud) by launching an AWS instance on which to run a Routing Active Testing AMI (Amazon Machine Image).
Prerequisites
Control Center account
You need an account in a Routing Active Testing Control Center in order to access it: either the one belonging to the Routing Active Testing SaaS solution or one installed on-premise in your organization. If you do not already have a Routing Active Testing account, please contact your Juniper partner or your local Juniper account manager or sales representative.
Routing Active Testing AMI for Test Agent
An Amazon Machine Image (AMI) is a special type of virtual appliance used to create a virtual machine within the Amazon Elastic Compute Cloud (“EC2”), which is part of Amazon Web Services. The AMI serves as the basic unit of deployment for services delivered using EC2.
A public AMI for Routing Active Testing is available under Community AMIs. The next chapter tells how to obtain and configure this AMI.
Launching an AWS instance
This chapter tells how to launch an AWS instance on which to run the Routing Active Testing AMI.
Be aware that the AMI is shared to a specific geographical region within EC2. Therefore you need to know what region that is and make sure you access the same region.
Logging in to Amazon EC2
Go to https://aws.amazon.com/ec2.
Click the button Get started with Amazon EC2.
Sign in to your AWS account:
Click Services on the top bar.
Click Compute, then click EC2. You are taken to the EC2 Management Console.
Choosing an AMI
In the left-hand pane, under Images, click AMIs.
In the drop-down which by default reads “Owned by me”, select Public images.
Enter the search term “juniper-paa”.
Enter the search term “Owner = 830665132438”. This is the owner account that signed the AMI.
You will find an AMI whose name begins with “Juniper-PAA-TA-Appliance”. Note the ID of this AMI.
Check the box next to this AMI, and click the Launch Instance from AMI button.
You are taken to the Launch an instance page.
Under Name and tags, enter a name for the instance. There is no need to add any tags for the instance.
Under Application and OS Images, enter “juniper-paa” in the search field. You will find the Test Agent AMI in the Community AMIs category. Verify that this AMI has the same ID as the one found in the previous search.
Click the Select button next to the Test Agent AMI. You are now taken back to the Launch an instance page.
Choosing an AWS instance type
A large number of AWS instance types will typically appear in this list. Which one to choose depends on the performance needed when running the AMI. We recommend an Amazon EC2 C5 instance for the Test Agent.
Selecting a key pair
Under Key pair (login) you can select a public/private key pair for connecting securely to your AWS instance via SSH. If you have such a private key, select it here. You can also create a new key pair. If you prefer to do without a key pair, select the option Proceed without a key pair.
Configuring network settings
The security group selected here must allow outgoing traffic on ports that the vTA needs in order to communicate with Control Center. Specifically, for SaaS, TCP port 443; for an on-premise installation, TCP port 6000. In addition, UDP port 123 needs to be open to permit NTP time sync.
The security group must also allow traffic on all ports needed for the testing you intend to do with the vTA.
Configuring storage
The recommendation here is to have at least 2 GB of storage. Add a suitable volume.
Configuring user data
It is highly recommended that you enter the cloud-init config for the vTA as user data, as explained below. Alternatively, you can configure this after launching the instance by connecting to the vTA via SSH and navigating the vTA console interface (see the Troubleshooting section).
Expand the Advanced details section at the bottom of the page.
Under User data, provide the cloud-init config for the vTA by pasting it into the box.
The basic cloud-init config is as shown below. Text in angle brackets < > needs to be replaced by the proper strings. Note that lines with parameter settings must be indented as shown. Lines where the default value is kept can be omitted.
#cloud-config
paa_test_agent:
  name: <vTA name>
  email: <Routing Active Testing user email address>
  password: <Routing Active Testing password>
  account: <Routing Active Testing account name>
  server: <Routing Active Testing server> (default: login.paa.juniper.net:443)
  management_interface: eth1 (default: eth0)
  management_address_type: dhcp | static (default: dhcp)
The following parameters are required only if management_address_type is “static”:
management_ip: <management IP address>/<prefix>
management_dns: <DNS server IP address>[,<DNS server IP address>]
management_default_gateway: <gateway IP address>
management_ntp: <NTP server IP address or host name> (default: time.google.com)
The following parameters are required only if the vTA is connecting to the server through an HTTP proxy:
http_proxy: <proxy server>
http_proxy_port: <proxy port>
http_proxy_auth_type: none | basic (default: none)
The following parameters are required only if http_proxy_auth_type is “basic”:
http_proxy_username: <proxy authorization user name>
http_proxy_password: <proxy authorization password>
The remaining settings can be left as-is.
Reviewing your instance settings and launching your instance
In the Summary pane on the right, check that all settings for the AWS instance are appropriate. Then click Launch instance.
Your instance should now appear under Instances in the EC2 Management Console. After it has started up, Instance State will be “running”:

The Test Agent will now automatically register with Control Center and will then appear in the Control Center web GUI under Test Agents. Check for the AWS instance name in that view to verify that the Test Agent has registered.
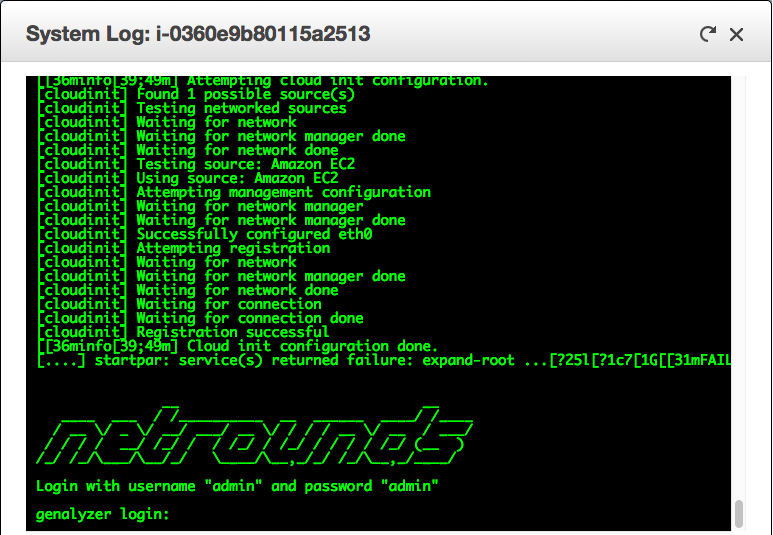
Verifying successful Test Agent configuration
To verify that the cloud-init configuration of the vTA instance has been successful and that you have access to the Test Agent user interface, proceed as follows:
Select the Routing Active Testing AMI in the AMI view.
Click the Actions button and select Instance Settings > Get System Log.
The log should look something like this:
Troubleshooting
If the vTA does not show up in Control Center, it is useful to open its local console to investigate the cause of the problem. This requires that you supplied an SSH public key when creating the AWS instance (see this section).
In the Instances view, inspect the public IP address of the instance.
At a command prompt, type:
ssh -i <private_key> admin@<instance_public_ip>
where <private_key> is the name of the file holding your SSH private key and <instance_public_ip> is the public IP address of the vTA instance.
You are now taken to the Test Agent admin menu:
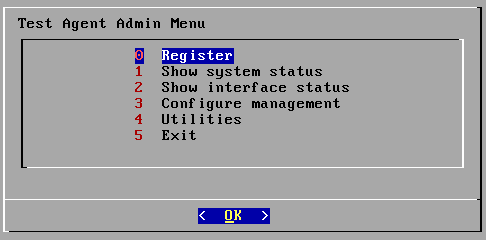
The functionality found here is described here. The following functions are particularly helpful:
Utilities > Ping for checking that the vTA has a working internet connection.
Utilities > Troubleshoot connection for verifying that the Routing Active Testing management connection is working.
Utilities > Root shell for leaving the local console and going to the Linux prompt.