Deploying a VHD virtual Test Agent image in Azure
Introduction
This page explains how to deploy a virtual Test Agent from Routing Active Testing as a virtual machine in Microsoft Azure.
Prerequisites
Control Center account
You need an account in a Routing Active Testing Control Center in order to access it: either the one belonging to the Routing Active Testing SaaS solution or one installed on-premise in your organization. If you do not already have a Routing Active Testing account, please contact your Juniper partner or your local Juniper account manager or sales representative.
vTA image
The VNF vTA image is provided either by Juniper’s partners or directly from Juniper.
The vTA image for Azure is provided in VHD format.
Once you have your vTA image, you need to upload it to your Azure environment and deploy it. This can be done either through the Azure web GUI or from the Azure CLI. Both procedures are described in this document:
Uploading and deploying a vTA image through the Azure web GUI
Signing in to Azure
Go to https://azure.microsoft.com. You will be redirected to a URL associated with your location. The description that follows deals with the English-language version of the GUI.
Sign in to your Azure account.
You should find a heading Azure services, under which there is an item Storage accounts.
Creating a storage account
Click the Storage accounts icon. This opens a view listing whatever storage accounts you have already defined.
Click + Create to create a new storage account.
Make the appropriate choice under Resource group (we are assuming here that some resource group has already been created).
Under Storage account name, enter a name for the storage account.
Under Region, select your geographical region.
The remaining settings can be left as-is.
Click the Review + create button at the bottom.
After validation has passed, click Create.
Your storage account is now created. Click the Go to resource button to bring up an overview page for the account.
Creating a storage container (blob)
On the left-side bar of the account overview page, scroll down to Data management > Blob inventory.
Click the button Add your first inventory rule.
Under Rule name, enter a name for the inventory rule.
Under Container, click the Create new link. In the box that appears, name the container, then click OK.
Under Object type to inventory, select Blob.
Under Blob types, check Page blobs.
For the other settings, the defaults can be kept here as well.
Then click Save. Your container is now created.
Uploading the Test Agent VHD file to the storage container
The next step is to upload your Test Agent VHD file to the storage container you just created.
On the left-side bar of the account overview page, under Data storage, click Containers.
Click the storage container in the list of containers.
Click Upload.
Under Files, select your Test Agent VHD file.
Expand Advanced.
Important
Under Blob type, select Page blob.
Keep the defaults for the remaining settings.
Click Upload.
The upload will take some time as the Test Agent VHD file is approximately 2 GiB in size.
Creating an image
In the search field at the top, type “images”. If an Images icon turns up, click it and you will be taken to the Images view. Alternatively, this view may appear right away.
Click + Create.
Make the appropriate choice under Resource group.
Under Name, enter a name for the image.
Under Region, select your geographical region.
Under OS type, select Linux.
Under Storage blob, browse to select the VHD file you uploaded in this section. Browse all the way to the VHD file, click the file, then click Select.
Leave the remaining settings unchanged.
Click Review + create.
After validation has passed, click Create.
A message “Your deployment is complete” will appear when the image has been created.
Creating a virtual machine
In this section we will create a virtual machine (VM) in which to run the vTA.
In the search field at the top, type “images”.
Click the Images item that turns up.
In the Images view, click the image you just created.
Click + Create VM at the top.
Under Project details, make the appropriate selections.
Under Instance details, do the following:
Enter a name for the virtual machine.
Under Size, select “Standard_D2_v5”, or whatever is suitable for your use case.
Add att least 8 GB data disk.
Under Administrator account, you need to provide an SSH key pair to be able to log in to the Test Agent admin menu later on:
Set Authentication type to “SSH public key”.
Enter an arbitrary string under Username. This setting cannot be left undefined, but it is not used when logging in to the Test Agent.
Under SSH public key, paste your SSH public key.
Under Inbound port rules, make the following settings:
Set Public inbound ports to “Allow selected ports”.
Under Select inbound ports, select “SSH (22)”.
Under Licensing type, select “Other”.
Keep the defaults for all other settings.
Click Review + create, then Create.
A message “Your deployment is complete” will appear when the virtual machine has been created.
Logging in to the Test Agent
Here is how to log in to the Test Agent via SSH. This is needed in order to register the Test Agent with the Routing Active Testing system, and it is also useful for troubleshooting:
In the search field at the top, type “virtual”.
Click the Virtual machines item that turns up. The Virtual machines view is displayed.
Select the virtual machine created for the Test Agent.
Note down the Public IP address of the virtual machine.
At a command prompt, type:
ssh -i <id_rsa> admin@<vm_public_ip>
where id_rsa is the name of the file holding your SSH private key and vm_public_ip is the virtual machine’s public IP address.
You are now taken to the Test Agent admin menu:
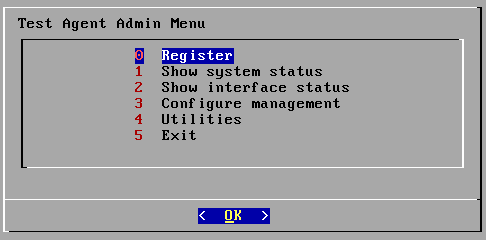
Here you can register the Test Agent with the Routing Active Testing system as described here. Upon registration, the Test Agent will be visible in Control Center.
Again, please note that initialization of the Test Agent with user data using cloud-init cannot be done through the web GUI. The Azure CLI must be used for this purpose; see the section Creating a virtual machine above. ** bort
The other functionality found in the console is described here. The following functions are particularly helpful:
Utilities > Ping for checking that the vTA has a working internet connection.
Utilities > Troubleshoot connection for verifying that the Routing Active Testing management connection is working.
Uploading and deploying a vTA image through the Azure CLI
A different way to create and manage Azure resources is through the Azure CLI. In this section we indicate how to use the CLI to perform the operations done via the web GUI here.
Full documentation of the Azure CLI is found here: https://docs.microsoft.com/en-us/cli/azure
Creating a storage account
Below we show:
how to create a resource group (this is assumed to exist in the web GUI in the section dealing with that GUI)
how to create a storage account within the resource group
how to create access keys. Access keys are used to authenticate applications when they make requests to the Azure storage account. They are needed for some of the operations that follow.
# Create resource group
az group create --location northeurope --name paa

# Create storage account
az storage account create --name paastorage --resource-group paa --location northeurope
export AZURE_STORAGE_ACCOUNT=paastorage

# Get access key
az storage account keys list --resource-group paa --account-name paastorage -o table
export AZURE_STORAGE_KEY=<one of the keys from the above command>
Creating a storage container (blob)
# Create storage container
az storage container create --name paacontainer --account-name paastorage --account-key AZURE_STORAGE_KEY
Uploading the Test Agent VHD file to the storage container
The VHD file you have downloaded from Control Center is named paa-test-agent_<version number>.vhd. This is provided as the --file attribute. The --name attribute specifies what the VHD file is to be called in Azure.
# Upload VHD
az storage blob upload --container-name paacontainer --file paa-test-agent_<version number>.vhd --name test-agent.vhd --type page --account-name paastorage --account-key AZURE_STORAGE_KEY
Creating a virtual machine
When creating a virtual machine for running the vTA, you need to use the --admin-username option to specify an admin user and the --ssh-key-value option to supply your public SSH key in a file (assumed to be named id_rsa.pub below).
# Create VM
az vm create --resource-group paastuff --name paavta --os-type Linux --image https://paastorage.blob.core.windows.net/paacontainer/test-agent.vhd --use-unmanaged-disk --storage-account paastorage --boot-diagnostics-storage paastorage --custom-data user-data.yaml --admin-username <username> --ssh-key-value id_rsa.pub
The attribute --custom-data is used to initialize the Test Agent with a Routing Active Testing cloud-init config in a YAML file (userdata.yaml). Note that this cannot be done through the web GUI. The YAML file has the following format:
#cloud-config
paa_test_agent:
  name: MyTAA
  email: myuser@email.com
  password: mypassword
  account: myaccount
An additional line server: can be included in the YAML file to specify a server different from the Routing Active Testing SaaS server (which is the default).
Provided that correct credentials are given here, the vTA will register automatically with the Routing Active Testing system and appear in the list of Test Agents in the Control Center GUI.